Super
Hero sculpts often have exaggerated musculature so the way I approach painting
them is by breaking down each muscle into a separate area with its own
highlight, mid tone and shadow. I’ll start off with a full coverage of the mid
tone. I’ll apply the shadows by placing the brush around the middle of the
muscle mass and pull the pigment downwards to the bottom of the muscle. For
highlights it will be in the opposite direction i.e. towards the top of the
muscle mass. The thigh muscles are slightly different as the raised areas are
towards the centre of the muscle and you’ll also have to bear in mind zenithal
lighting so the top part of each muscle mass should be lighter too.

1.
I started off with the zenithal priming method, for those that don’t know it
basically priming with black to the underneath of the miniature. Grey primer is
then applied at an angle of around forty-five degrees and finally primed with
white from directly above the miniature. For me it gives me clear guidance on
where to place the highlights and shadows and if you apply your paint in thin
coats the highlights and shadows should still show through.
2. Base coat for the skin is Citadel’s Cadian Flesh
mixed with equal parts of water.
3. A second coat of Cadian Flesh is applied but just
keeping to the top two thirds of each muscle.
4.
Remembering that you already have shadows and highlights from the zenithal
priming, it will save time if your paint is applied in thin layers. My method involves
mixing paint with water and flow improver in a 1:1:1 ratio. This keeps the
layers quite thin and you are able to keep the good work of the priming. I
started off with the trousers with a thin coat of Vallejo’s German Grey to the
deeper areas of the muscles of the leg. I used the same colour for the gloves,
boots and mask in stage 5.
5.
A second coat of the thinned German Grey. There’s no need to be particularly
careful here as you’ll be going over the previous layer too, and the previous
coated recesses below will end up a much darker colour. Once dried you should still be
able to see the lighter raised areas in the musculature.
6. The green pipes were
given a couple of coats of Scale 75’s Irati Green
7.
The flesh areas were then given a wash with Citadel’s Reikland Fleshshade.
8.
In order to get a smooth transition of colour I layered on Cadian Flesh staying
away from the shadow areas and staying up in the top areas of each muscle.
9.
This shows the beginnings of the transition
10. For
the highlights I started with a few coats of Citadel’s Cadian Flesh and Kislev
Flesh mixed about 50:50 and added the same amount of water to paint, placing
the brush towards the halfway point of the muscle mass and stroking the brush
towards the highlight areas, the lighter pigment should then begins to show
after a few strokes.
11.
This shows the lighter pigment towards the top of the muscle area.
12.
Continuing the highlights I used a few coats of Citadel’s Kislev Flesh and
water mixed about 50:50 and placing the brush towards the top third of the
muscle mass and stroking the brush towards the highlight areas, the lighter
pigment should then begins to show after a few strokes
13. This
shows the lighter pigment towards the top of the muscle area.
14.
I carefully picked out the veins with Scale 75’s Sherwood Green
15. I
carefully applied a wash to either side of the veins with a 50:50 mix of Citadel’s
Biel Tan Green and Lahmian Medium.
16. I
used a very thin coat of Citadel’s Flayed One Flesh for the final highlight of
the skin. This layer is almost a glaze consistency and keeping the paint to the
absolute top of each muscle. This will intensify the highlight area nicely. If
you need to, feather out the border with a wet brush.
For the trousers I’m using an
old technique I was taught by Marc Masclans, if you are unfamiliar with his
stuff, look him up, he’s a genius. It uses a process of laying down multiple
lines in an area and then applying the next colour (usually lighter) in a smaller
area to create volume and texture. It’s difficult to see with black and grey so
I’ve included a pic of Darkseid where I used the same technique for the blues
on the legs.
17. For
Bane I picked out quite a few greys to build up a gradient, the first being
German Grey mixed with a little Vallejo Game Colour Heavy Blue Grey. Keep the
paint very thin, one part paint to two parts water. The thin lines are applied
to individual muscles just like we did with the skin previously. Start and
finish each line within the border of the muscle so that you leave a small area
darker at the edge surrounding the muscle.
18. For
this stage I added more Blue Grey to the mix and a little more water. Same
process again, adding thin lines across the muscle staying away from the edge
of the last layer so that you begin to build up volume i.e. the raised parts of
the muscle are lighter than the recesses.
19. Apply
another coat using the same mix of paint. If you can add the lines to a
slightly smaller area than the last coat, that would be better but isn’t
essential. The second coat will build up the opacity of this colour. After a
couple of strokes the top area should have a nice highlight and have a gradient
into shadow. I’ll wet my brush and feather out the border.
20-21.
Going lighter again I used thin coats of the previous mix but added a little
white to the mix to build up the highlights of the leg muscles, concentrating
on the raised areas. With these areas I started slightly above the area I
wanted to highlight and pulled the pigment up into the area to be highlighted.
To
counter act the light I used a thin black wash and started the stroke about a
third from the bottom of each muscle and pulled the pigment down into the
shadow area.
You can go back and forth a couple of times here until you are happy with the transition.
22. A
final highlight with a little more white added to the previous mix, it should
be close to a light grey now. This is applied to the centre line of the muscle
mass. Don’t worry if you go too light as you can always glaze back over with
black to tone it down again.
23. I
wanted to add a splash of interest to the shin guards and decided on some rust.
The base coat here was Citadel’s Warplock Bronze as I wanted a slight shine at
the edges. If you wanted a more matt appearance you can use any dark brown for
this stage.
24.
Citadel’s Skrag Brown was applied with a small piece of sponge. If you haven’t
used sponge before you will need a small piece from the sponge in your blister
pack, dab it into the paint then dab off the excess of paint onto a paper towel
and the dab on the paint to the model. It’s a bit like drybrushing technique. Always test the sponge on paper
first though to get an idea how much paint is still on the sponge.
25. For
this stage I used a stipple brush but if you don’t have one, sponge will work
just as well but you will need to control where the paint goes. I used
Citadel’s Troll Slayer Orange for this stage
26. A
final highlight of Citadel’s Fire Dragon Bright is dotted in a random pattern
with a normal brush.
27. The
belt was given a base coat of Citadel’s Ironbreaker.
28.
Moving on to the vest now, I use a particular paint mix if I want to keep the
shadows and highlights from the zenithal priming. Here I’m using Citadel’s
Steel Legion Drab, water and Flow Improver in a 1:1:1 ratio. Unfortunately this
will take a bit of practice to get a nice consistency, everyone’s judgement of
a ‘drop’ is different. Leave to dry completely before adding a second coat.
29. Same
process as before treat each muscle as a separate area e.g. left pec, right pec
and each abdominal muscle. Shade the bottom area of the chest and abdominal
with Steel Legion Drab mixed with a little German Grey. Keep it thin and start
the stroke from the bottom third of the area and pull the pigment down into the
shadow area. Feather off the border at the beginning of the brush stroke if
needed.
The bat
signal was coated with Vallejo’s Burnt Iron or any dark metal will do. The belt
was shaded with a black wash.
The rocky base was coated with Vallejo's Dark Sand.
30. First
highlight to the vest is with Citadel’s Zandri Dust. The brush stroke can start
about half way or the middle of the area and push the pigment up into the
highlight area. You should now start to see a bit of gradient.
31.
Another highlight using a 50:50 mix of Zandri Dust and Ushabti Bone. Use about
1:1 ratio of paint to water and apply an edge highlight to the vest. Once you
are happy with that add more water and add another highlight to each muscle by
starting the stroke from the top third of the muscle and push the pigment up into the highlight
area.
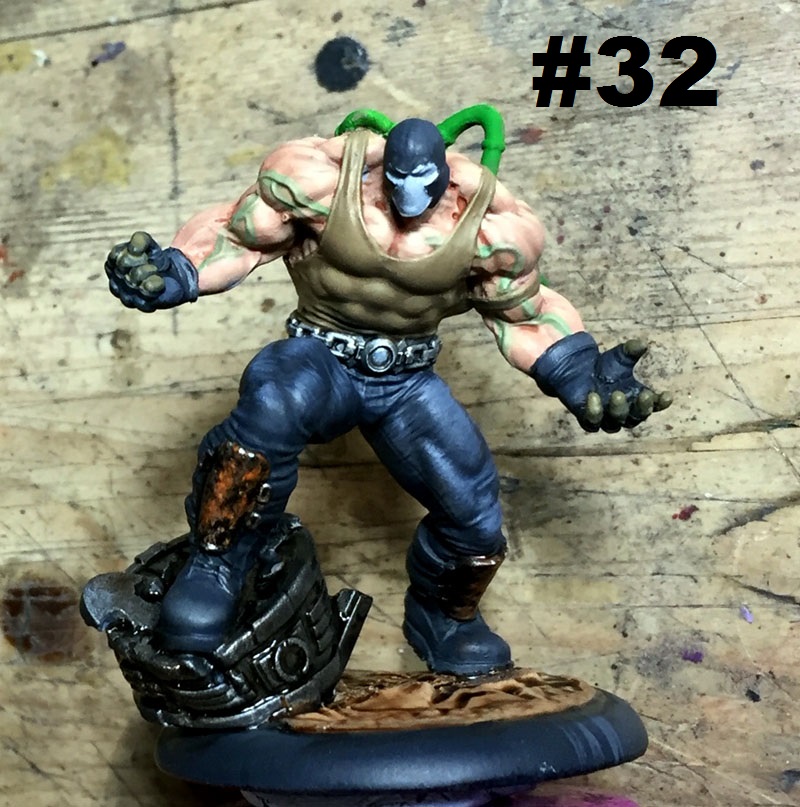
32. The
bat signal and base were given a liberal wash with Agrax Eathshade and left for
a while to dry.
33. I
forgot to do the flesh of the fingers so applied some Cadian Flesh there. I
also started to edge highlight the bat signal with Blue Grey.
34. I
lined the outer eye area and the inside of the belt buckle with German Grey
mixed with some black. When dry I painted a thin line across the eye with white
and then over the top of that with red. Highlight then with an orange dot.
35. I
added a little bit of Vallejo’s Burnt Red to the bottom part of the buckle
circle just to get a bit of contrast in there and then added a bit of yellow
and white to the top of the circle. The mask was then defined with Vallejo's Light Grey.
I lined the edges of the vest against the flesh using a thinned down German
Grey. Fingers were highlighted using the same method as the rest of the flesh
above.
I then thinned down the burnt red and used it as a glaze to tone down the eyes, trying to leave the darker colour towards the outside of the yes.
The rocks of the base were basecoated with German Grey, once dry drybrushed with Blue Grey and finally another highlight of light grey mixed with white.
36. I
washed the veins with Biel Tan Green again as I wasn’t happy with them, but this time I covered all of the veins, not just at the sides to give them a more saturated appearance followed by another pass to the edges. The same
wash was applied to the pipes at the back. The mask was highlighted with white along the eye brow area and under the eye at the edge of the cheek and the bridge of the nose.I thinned the white with water and highlighted the extreme edges of the bat signal
37. I
highlighted the veins and pipes with Irati Green mixed with a golden yellow
just to gain a bit of definition.
All in
all a very nice mini to paint, I quite enjoyed going outside the normal box art
paint job. It was great practice for getting contrast on the musculature too.
Just remember when you are painting miniatures with big muscles keep your paint
thin and be patient to build up the gradient.
Here's
the finished mini under decent lighting.
I’d love
to hear from you if you give this a go, just get in touch in the comments below
or look me up on Facebook.
Hope you
enjoyed it and hopefully see you again soon.
Cheers,
DB