Hi,
My apologies for straying into my other love, the world of Harry Potter, but it won't happen too often.
I always try to make some scenery as a backdrop for taking pictures of my painted miniatures but this time I wanted to make something that could be used for game play too. You may have seen my Chamber of Secrets and other corridors from Hogwarts before but this time I wanted to recreate the scene where Umbridge issues her proclamations and they are all added to the wall.
My main problem was that I needed some frames for the proclamations. I've been using a few bits from Eddie's The Alchemist's Workshop like his windows on other projects so I approached him about making the frames.
On to the construction :-)
I use foam tiles from Firedragon Games based in the UK. Again nice quality and relatively cheap.
Here's a link
The plain tiles are 11" square, so cutting them in half still works as a decent height for each of the walls.
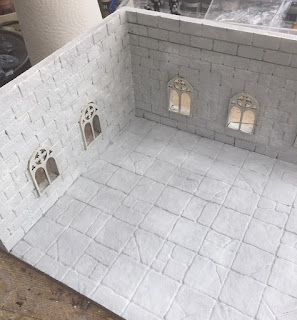
I used a metal ruler and a dental tool to score the brickwork, each brick was 1/2 inch high and 1" long. I then primed the tile using acrylic paint. Warning do not use rattle can primer, trust me you'll be sorry!
Luckily the floor tiles are molded so I just had to prime them.
I noticed on the game boards that came with the core set were 7 squares across so I used this as a guide for the width. They were cut to size with some left over for the walls to sit on leaving 7 squares visible.
I wanted to jazz up the walls by adding windows.
Here's a link to the ones I used.
https://www.thealchemistsworkshop.com/product-page/10-pack-ornate-round-arched-window
Place them on the tiles at the height required, I measure an inch from the floor and traced around the window frame
I traced around the inside of the frame too. This is because I wanted the windows to rest on the walls rather than fit inside the holes.
Carefully cut in between the inner line and the outer line.
Remove the cut out blocks.
You should cut away inside the outer line, this will allow some room to glue the window.
Apply the glue to the outer edge of the frame. I used quick drying PVA.
Leave to dry.
I glued two walls together
Then prepared to glue to the floor.
I used cut paper clips as pins to hold the walls in position whilst they dried.
The proclamation frames were fixed to a spare bit of board using some blue tac and primed. You can use a rattle can primer for this stage.
While they were drying I found some pictures online, saved them and printed them out. I got the correct size on the third attempt. After copying the image in a word file so that I had enough proclamations and then hit print.
The frames were painted with Vallejo's Woodgrain but any dark brown will do. I cut out each proclamation and fixed them to the bottom part of the frame using PVA glue and glued the top part of the frame in to place and let them dry.
Back to the board.
After about 3 coats of white paint, most of it is absorbed by the foam, I had an opaque layer to paint.
I've been using Citadel's Zandri Dust for my miniature's bases so I thought I'd continue the theme. I thinned the paint to about 1 part paint and 3 parts water. Once that had dried I used a brown wash to outline the bricks. The arch in the doorway was made with very thin 'fun foam' from a hobbycraft shop, cut out four staggered layers and glue together.
Glue the proclamations using PVA glue.
Done :-)


Blooming brilliant... One shall be stealing your ideas :)
ReplyDeleteNice one, cheers
Delete